Staining Techniques
Staining Techniques: Method of smear preparation. Differential staining methods: Gram staining, AFB staining, Albert’s staining, and capsule staining. Preparation of staining solutions and their storage.
MICROBIOLOGY
Dr Pramila Singh
9/24/202410 min read
Staining Techniques: Method of smear preparation. Differential staining methods: Gram staining, AFB staining, Albert’s Staining, and Capsule Staining. Preparation of Staining Solutions and their Storage.
Staining techniques: The staining technique in microbiology is the application of colored dyes or stains to biological specimens. Staining techniques require several reagents such as stain solution, Mordents agent, decolorizing agents. etc.
Stains: Stains in staining techniques are colored dyes or chemicals. They are applied to biological specimens to enhance their visibility under a microscope. They interact with cellular components, such as cell walls, nucleic acids, or proteins, to produce a color change. This makes the cellular structures more visible. Stains may be natural or synthetic. There are three types of stains:
Acidic stains: They are acidic. They are mainly used to develop colored backgrounds. Example: Eosin
Basic stain: They are alkaline. They are used to develop color in microbes cells. Examples: Methylene blue, crystal violet, safranin, basic fuschin, etc.
Neutral stains: They are mainly used to develop color in the cytoplasm of the cell. Example: Giemsa stain.
Mordant agents: Mordants are chemical substances used to intensify the staining of biological specimens. They act as a bridge between the stain and the tissue or cell. They increase the affinity of the stain for the target structure. Mordants improve the sensitivity and specificity of staining techniques.
The choice of mordant depends on the specific stain and the target cell. Some common mordants used in microbiology:
Iodine: Used in Gram staining and other techniques.
Tannic acid: Used in various staining techniques, including the Ziehl-Neelsen stain for acid-fast bacteria.
Alum: Used in some staining techniques, such as hematoxylin staining for histological sections.
Accentuating agents are added to staining solutions to enhance the staining process or to improve the visibility of specific cellular structures. They do the following:
Increasing the affinity of the stain for the target structure.
Reducing the background staining of non-target structures.
Enhancing the intensity or contrast of the stained structures.
Modifying the pH of the staining solution to optimize staining conditions.
Common accentuating agents include:
Mordants: These are substances that help to fix the stain to the tissue or cells. Examples include iodine, tannic acid, and alum.
Fixatives: These are substances that preserve the structure of cells and tissues. Examples include formalin, ethanol, and glutaraldehyde.
Decolorizers: These are substances that remove excess stains from non-target structures. Examples include acetone and alcohol.
Counterstains: These are stains used to differentiate between different cell types or structures. Examples include safranin and eosin.
pH buffers: These are substances used to maintain a specific pH in the staining solution. Examples include phosphate buffers and citrate buffers.
The choice of accentuating agent depends on the specific staining technique. Accentuating agents improve the quality and reliability of staining results.
Objective of staining technique:
To improve the visibility of biological specimen components under the microscope.
To identify and study various biological structures.
To identify and study microorganisms.
Types of Staining
Simple Staining: This uses a single stain to color all cells in a sample. It helps to determine the morphology and size of microorganisms. Examples:
Methylene blue: A simple stain that stains all cells blue.
Crystal violet: A primary stain used in Gram staining to differentiate between Gram-positive and Gram-negative bacteria.
Safranin: A counterstain used in Gram staining to color Gram-negative bacteria pink or red.
Differential Staining: This uses multiple stains to differentiate between different types of cells or cellular components. Examples:
Gram Staining:
Acid-fast Stainin
Albert’s stain
Special Staining: This involves specific stains to highlight particular structures or components within cells. Examples:
a.Giemsa stain: A stain used to stain blood cells and identify parasites.
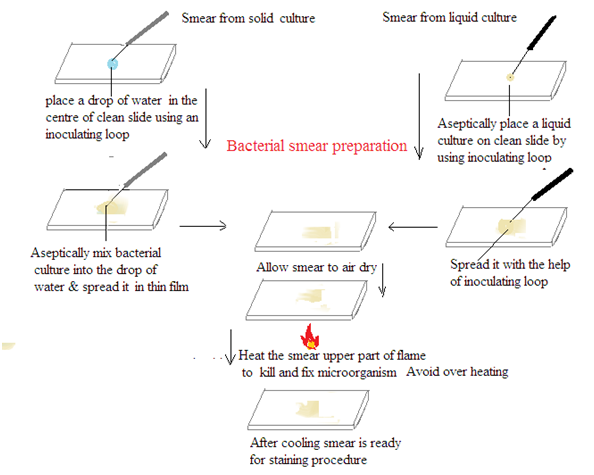
METHODS OF SMEAR PREPARATION: Smear preparation involves the spreading of a sample (e.g., bacterial culture, tissue) onto a microscope slide for staining and examination.
Materials: Microscope slide, Inoculating loop or needle, Bunsen burner or alcohol lamp, Sample (e.g., bacterial culture, tissue), Staining reagents (if applicable)
Procedure:
Clean the slide: Use a paper towel or lens cleaning solution to remove any dirt or residue from the microscope slide.
Label the slide: Write the sample identification on the frosted edge of the microscope slide.
Transfer the sample:
Liquid samples: Place a small drop of the sample onto the slide.
Solid samples: Place a small amount of the sample onto the slide and mix with a drop of sterile water or saline.
Smear the sample: Use a sterile inoculating loop or needle to spread the sample evenly across the slide. The smear should be thin and translucent.
Air dry: Allow the smear to air dry completely at room temperature.
Heat fix (optional): Pass the slide through a Bunsen burner flame two or three times to fix the sample to the slide and then cool it.
Stain (optional): Apply the appropriate staining reagents.
Rinse and dry: Wash the slide with distilled water to remove excess stain. Allow it to air dry.


DIFFERENTIAL STAINING
This uses multiple stains to differentiate between different types of cells or cellular components. Examples:
a. Gram Staining
b. Acid-fast Staining
c. Albert’s stain
Gram Staining
Principle of Gram Stain
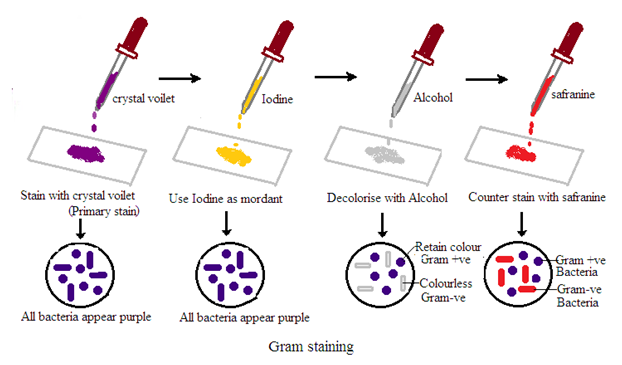
Gram stain is a differential staining technique. It is used in microbiology to classify bacteria into two groups based on their cell wall characteristics. The staining process involves several steps:
1. Crystal Violet Staining: The bacterial smear is initially treated with crystal violet, which stains all cells purple.
2. Iodine Treatment: Iodine is applied to form a crystal violet-iodine complex. This step is essential to stabilize the crystal violet stain.
3. Alcohol Decolorization: The smear is treated with alcohol or acetone. This step differentiates bacteria based on their cell wall properties. Some bacteria retain the crystal violet-iodine complex and remain purple (Gram-positive). Others lose the stain and become colorless (Gram-negative).
4. Counter Staining: The final step involves applying a counterstain. Usually, safranin stains the colorless Gram-negative bacteria pink or red. Gram-positive bacteria retain the initial crystal violet stain and appear purple.
Significance of Gram’s Stain
1. Bacterial Classification: Bacteria are classified into two main groups: Gram-positive and Gram-negative. This classification is based on Gram's staining. Gram staining depends on the cell wall structures of bacteria.
2. Clinical Relevance: The Gram stain result is one of the initial steps to identify and characterize bacterial infections. It helps in treatment decisions. Since Gram-positive and Gram-negative bacteria respond differently to antibiotics.
3. Preliminary Identification: Gram stain provides a quick and preliminary identification of bacteria. It helps microbiologists in selecting further tests for more accurate identification.
4. Shape and Arrangement: Gram stain also provides information about the shape (cocci or bacilli) and arrangement (clusters, chains, pairs) of bacteria.


Interpretation of Gram’s Bacteria:
1. Gram-Positive Bacteria: These bacteria retain the crystal violet-iodine complex and appear purple under the microscope. Common Gram-positive bacteria include Staphylococcus and Streptococcus.
2. Gram Gram-negative bacteria: These bacteria lose the crystal violet-iodine complex during decolorization and take up the counterstain, appearing pink or red under the microscope. Examples of Gram-negative bacteria include Escherichia coli and Pseudomonas.
3. Cell Morphology and Arrangement: Gram's stain allows for the observation of bacterial cell morphology (round or rod-shaped) and arrangement (singles, pairs, chains, clusters). This is useful in preliminary identification.
4. Clinical Implication: The Gram result guides clinicians in choosing appropriate antibiotics. Gram-positive and Gram-negative bacteria have different cell wall structures. Thus their susceptibilities to antibiotics vary.
AFB Staining
Principle, significance, and interpretation of stains - Ziehl Neelson’s – for AFB and Leprae
Principle of Ziehl-Neelson’s Stain
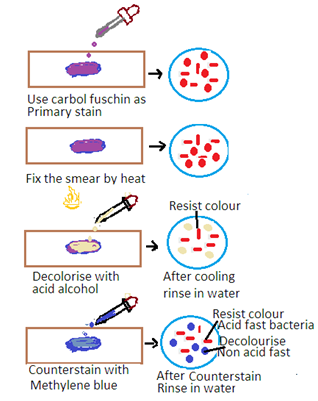
The Ziehl-Neelsen stain is a special staining technique used for the detection of acid-fast bacteria (AFB) such as Mycobacterium tuberculosis (the causative agent of tuberculosis) and Mycobacterium leprae (the causative agent of leprosy). The stain is based on the property of mycobacteria to resist decolorization by acid-alcohol after staining with carbol fuchsin. The principle has the following steps
1. Primary Stain: The specimen is initially stained with carbol fuchsin. Carbon fuscin is a red dye containing phenol. This dye penetrates the mycobacterial cell wall, and the cells retain the stain due to their high lipid content.
2. Heat fixation: The stained specimen is heated to enhance the penetration of the dye into the mycobacterial cells.
3. Decolorization: Acid-alcohol is used as a decolorizing agent. Acid-fast bacteria resist decolorization due to the lipid-rich cell wall. Other bacteria are decolorized.
4. Counter Staining: The smear is counterstained with a contrasting color, usually methylene blue, to visualize non-acid-fast bacteria.


Additional Points for Mycobacterium leprae:
Modified Zeihl-Neelsen Stain for leprae: A modified Ziehl-Neelsen stain is used for the detection of Mycobacterium leprae. This modification is required due to the low number of bacilli in leprosy lesions. A prolonged staining and careful examination is carried out..
Significance of Ziehl-Neelsen Stain:
1. Specific for Acid-Fast Bacteria: The Ziehl-Neelsen stain is highly specific for acid-fast bacteria, making it a crucial tool for the diagnosis of tuberculosis and leprosy.
2. Rapid Detection: The stain is relatively quick and can provide rapid results, facilitating timely diagnosis and treatment initiation.
3. Field Use: Ziehl-Neelsen stain is used in resource-limited settings. It is very useful in the field due to its simplicity and effectiveness.
Interpretation of Zeihl-Neelsen Stain
Acid-Fast Bacteria: Acid-fast bacteria will appear as bright red or pink rods under the microscope. It indicates that they have retained the carbol fuchsin stain.
Non-Acid Fast Bacteria: Other bacteria and cellular components will appear blue or green due to the counterstaining with methylene blue.
Clinical Correlation: The presence of acid-fast bacilli in clinical specimens is significant and requires correlation with clinical and other laboratory findings for a definitive diagnosis.
Albert Staining
Albert staining is a differential staining technique used to identify Corynebacterium diphtheria. Corynebacterium diphtheria is the causative agent of diphtheria. This bacterium is characterized by the presence of metachromatic granules.
Principle of Albert Staining
Albert staining is a differential staining technique used to identify the presence of metachromatic granules in bacteria. Chemically metachromatic granules are polyphosphate-rich granules. These granules develop different colors with the staining solution during the Albert staining process. There are two types of Albert staining solutions.
Primary stain: It is Albert's solution A. It contains a mixture of toluidine blue and malachite green.
Toluidine blue stains the metachromatic granules a dark blue or purple color. It is due to a chemical reaction between Toluidine blue and metachromatic granules (polyphosphate-rich granules).
Malachite green stains develop a light green color in the bacterial cytoplasm.
Counterstain: Albert's solution B contains iodine and potassium iodide. This solution intensifies the staining of the metachromatic granules. This makes them appear even darker.
Procedure:
Prepare a smear: Place a small amount of the sample (e.g., a swab from a patient's throat) on a clean glass slide.
Air dry: Allow the smear to air dry completely.
Heat fix: Pass the slide over a Bunsen burner flame several times to fix the bacteria to the slide.
Apply Albert's Stain A: Cover the smear with Albert's Stain A and let it sit for 3-5 minutes.
Rinse: Gently wash the slide with distilled water.
Apply Albert's Stain B: Cover the smear with Albert's Stain B and let it sit for 1 minute.
Rinse: Gently wash the slide with distilled water.
Air dry: Allow the slide to air dry completely.
Examine under the microscope: View the slide under a microscope using the oil immersion lens.


Results:
Corynebacterium diphtheriae: The bacteria will appear as rod-shaped organisms with purple-black metachromatic granules against a light green background.
Other bacteria: Most other bacteria will not stain the same way, allowing for the identification of Corynebacterium diphtheriae.
Importance of Albert Staining:
Rapid identification: Albert staining provides a relatively quick and reliable method for diagnosing diphtheria.
Isolation: Positive results can guide further isolation and testing of the bacterium.
Treatment: Early diagnosis and treatment of diphtheria are crucial for preventing severe complications and transmission.
Staining of Capsule
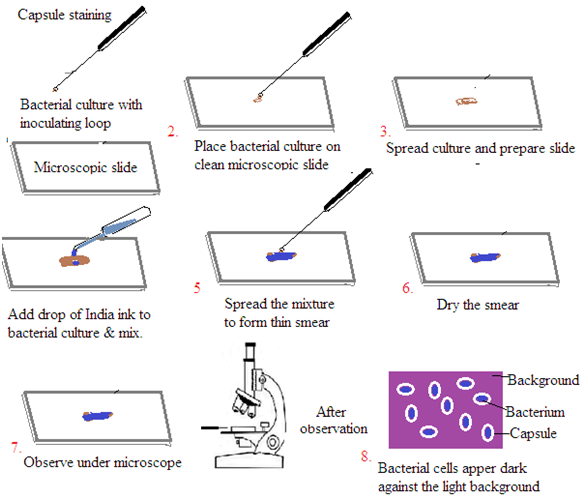
Capsule staining is a technique used to visualize the gelatinous capsule surrounding certain bacteria. These capsules are composed of polysaccharides or polypeptides. It is difficult to stain bacterial capsules using traditional methods. The capsule stain technique involves staining the background and the bacterial cells. This leaves the capsule unstained.
Principle
Background staining: A dye, such as India ink or nigrosin, is used to stain the background.
Cell staining: A basic dye, like crystal violet or methylene blue, is used to stain the bacterial cells.
Capsule visualization: The capsule remains unstained. It appears as a clear halo around the stained bacterial cells.
Procedure (India Ink Method)
Prepare the slide: Place a small amount of the bacterial culture on a clean microscope slide.
Add India ink: Mix the bacterial culture with a drop of India ink.
Create a thin smear: Spread the mixture evenly to create a thin film.
Air dry: Allow the slide to air dry completely. Do not heat fix. Heat fixing can destroy the capsule.
Observe: Examine the slide under a microscope using the oil immersion objective. The bacterial cells will appear dark against the light background, and the capsules will be visible as clear halos.


OtherMethods
Maneval's stain: Uses acid fuchsin to stain the cells and Congo red to stain the background.
Anthony's capsule stain: Uses crystal violet and copper sulfate.
Precautions
Avoid heat fixing: Heat fixing can disrupt the capsule structure.
Use a gentle smear: Excessive smearing can damage the capsule.
Use fresh cultures: Older cultures may have lost their capsules.
Applications
Identification of bacteria: Some bacteria can be identified based on the presence or absence of a capsule.
Study of virulence: Capsules can contribute to bacterial virulence by protecting the bacteria from the host's immune system.
Research on biofilm formation: Capsules play a role in biofilm formation.
PREPARATION OF STAINING SOLUTIONS AND THEIR STORAGE.
Staining solutions are used in microbiology and histology. They are used to colorize cellular structures and components. Proper preparation and storage of these solutions ensure their effectiveness and longevity.
Common Staining Solutions and Their Preparation
Gram Stain
Crystal violet: Dissolve 1 gram of crystal violet in 100 mL of 95% ethanol.
Gram's iodine: Dissolve 1 gram of iodine and 3 grams of potassium iodide in 100 mL of distilled water.
Decolorizer: Prepare a mixture of 95% ethanol and acetone (1:1 ratio).
Safranin: Dissolve 2.5 grams of safranin in 100 mL of 95% ethanol.
Acid-Fast Stain
Carbol fuchsin: Dissolve 1 gram of basic fuchsin in 100 mL of phenol (carbolic acid) solution (5%).
Acid alcohol (Decoloriser): Prepare a mixture of 3% hydrochloric acid in 95% ethanol.
Methylene blue: Dissolve 0.3 grams of methylene blue in 100 mL of distilled water.
Giemsa Stain
Stock solution: Dissolve 1 gram of Giemsa powder in 100 mL of absolute methanol.
Working solution: Dilute the stock solution in buffer (pH 6.8-7.2) to the desired concentration (usually 1:10 or 1:20).
Storage of Staining Solutions
Store in a cool, dark place.
Label clearly with the solution name, concentration, and preparation date.
Tightly seal containers to prevent evaporation and contamination.
Check expiration dates or signs of deterioration.
Discard solutions that have become discolored, cloudy, or contaminated.
Additional Considerations
Prepare fresh solutions when necessary. Some solutions, especially those containing dyes that fade over time, may require frequent preparation.
Proper storage is crucial for maintaining the effectiveness of staining solutions. Incorrect storage can lead to degradation and unreliable results.
