Immunology and Mycology Practical
HSBTE DMLT IVth Semester Immunology and Mycology Practical
Dr Pramila Singh
3/16/202412 min read
HSBTE. DMLT-IVth Semester Immunology and Mycology Practical
Experiment No 1
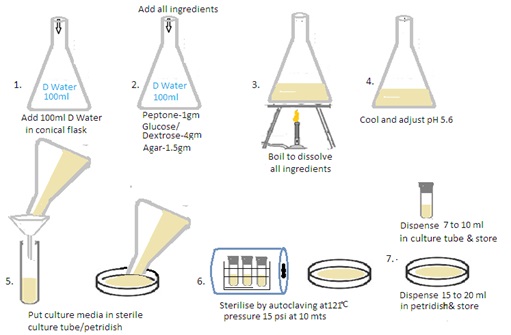
Aim: Preparation of different culture media used in mycology - Sabouraud's dextrose agar with and without antibiotics, Corn meal agar, BHI (Brain, Heart Infusion).
Theory: Fungal culture media are specialized formulations used to cultivate and grow fungi in the laboratory. These media provide the necessary nutrients, pH, and other conditions that support the growth of various fungal species. There are several types of fungal culture media. Each fungal media is designed to meet specific requirements for the isolation, identification, and study of fungi. The composition of these media can vary based on the nutritional needs and environmental preferences of different fungal species.
Sabouraud Dextrose Agar (SDA):
It contains dextrose (glucose), peptone, and agar. It is widely used for the isolation and cultivation of yeasts and molds. The acidic pH (around 5.6) inhibits bacterial growth, allowing for the selective growth of fungi.



Experiment No 2
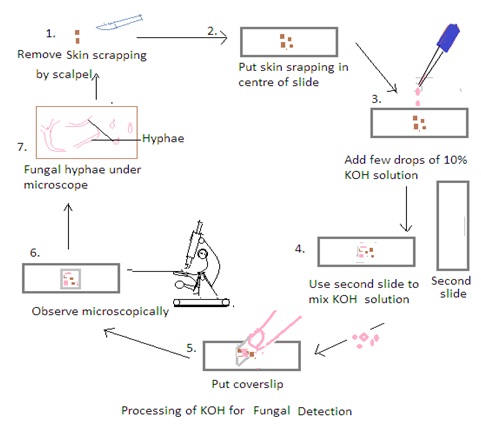
Aim: To perform wet mount using KOH
KOH Preparation
A potassium hydroxide (KOH) preparation is a simple and widely used laboratory technique in the collection and processing of samples in mycology for the diagnosis of fungal infections in the skin, nails, and hair. KOH is an alkali that is used to digest keratin in samples. Keratin is a protein present in the skin, hair, and nails. Keratin digestion allows the clear visualization of fungal elements under a microscope.
Materials Needed:
1. Specimen: Clinical specimens such as skin scrapings, hair plucking, or other material collected from the affected area.
2. 10% KOH Solution.
3. Microscope Slides and Coverslips: Clean and sterile glass slides and coverslips for mounting the specimen.
4. Microscope: A light microscope with appropriate magnification for fungal examination.
Procedure:
1. Obtain the Specimen: Place a small portion of the clinical specimen (e.g., skin scraping, hair plucking) on a clean glass slide.
2. Add KOH to the Specimen: Apply a few drops of the 10% KOH solution to the specimen on the slide. Ensure that the specimen is well-covered by the KOH solution.
3. Mix and Disperse: Use a second clean glass slide to mix and disperse the specimen in the KOH solution. Gently press down on the specimen with the second slide to spread it out and help in the dissolution of keratin. It also ensures thorough mixing to break down the tissue and release fungal elements.
4. Cover with a Coverslip: Place a clean coverslip over the mixture to create a wet mount. Press down gently to spread the specimen uniformly and reduce air bubbles.
5. Let it Stand: Allow the KOH mount to stand for a few minutes (usually 5-10 minutes). The KOH solution dissolves keratin, making fungal elements more visible under a microscope.
6. Examine Under the Microscope: Place the prepared KOH mount on the stage of a light microscope and examine it under low and high magnifications. Fungal elements such as hyphae, spores, and other structures become more apparent after the keratin
Use Staining Technique if needed: KOH preparation allows for the visualization of fungal elements. Stains such as calcofluor white or fungal-specific stains may be used to enhance visibility.

Experiment No 3
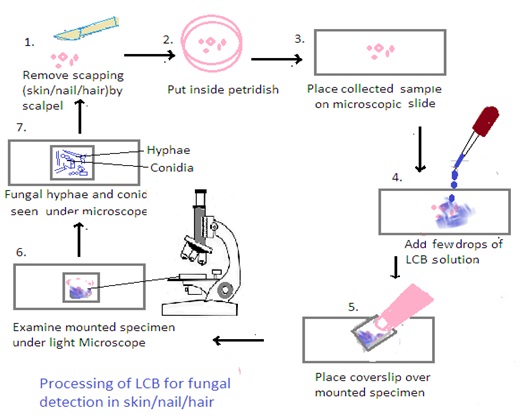
Aim: To perform wet mount using LCB.
Processing of Samples using Lactophenol Cotton Blue (LCB):
1. Preparation of LCB Mounting Medium: Lactophenol cotton blue (LCB) is a solution that contains lactophenol, which is a mixture of lactic acid, phenol, glycerol, and cotton blue stain. Mix the LCB solution thoroughly before use.
2. Mounting the Sample: Place a small amount of the collected material (skin scrapings, nail clippings, or hair samples) on a clean microscope slide.
3. Addition of LCB: Add a drop of LCB solution to the specimen on the slide. The LCB stain helps to clear the sample and make fungal structures more visible under the microscope.
4. Cover Slip Placement: Gently place a cover slip over the specimen, being careful to avoid trapping air bubbles. Press down gently to spread the LCB and ensure an even distribution.
5. Microscopic Examination: Examine the mounted specimen under a light microscope, using both low and high magnifications. LCB helps in visualizing fungal structures such as hyphae, conidia, and other reproductive structure

Experiment No 4
Aim: To study characteristics of common laboratory fungal contaminant Rhizopus:
Rhizopus is a common laboratory fungal contaminant that belongs to the class Zygomycetes. Here are some characteristics of Rhizopus as a fungal contaminant:
1. Morphology: Rhizopus appears as rapidly growing, cottony white to grayish colonies on culture media. It produces sporangia, which are asexual reproductive structures, containing sporangiospores (spores) on top of erect hyphae.
2. Fast Growth: Rhizopus species are known for their rapid growth rate, often outcompeting slower-growing organisms on culture plates.
3. Colonial Appearance: Colonies may spread quickly and can become quite large within a relatively short period, covering a significant portion of the agar surface.
4. Temperature Range: Rhizopus species are typically mesophilic, thriving at moderate temperatures commonly encountered in laboratory settings (20-30°C). However, some species may also grow at higher temperatures.
5. Hyphal Structure: The hyphae of Rhizopus are coenocytic, meaning they lack septa (cross-walls), which allows for rapid growth and spread.
6. Spore Formation: Rhizopus reproduces both sexually and asexually. Asexual reproduction occurs through the formation of sporangia, which release spores upon maturation. Sexual reproduction involves the formation of zygospores, which result from the fusion of specialized hyphae called gametangia.
7. Ubiquitous Distribution: Rhizopus species are commonly found in soil, decaying organic matter, and various food substrates. Consequently, they are often encountered as contaminants in laboratory settings, particularly in cultures involving organic materials.
8. Pathogenic Potential: While Rhizopus is more commonly associated with food spoilage and environmental contamination, some species within the genus, such as Rhizopus oryzae, can cause infections in humans, particularly in immunocompromised individuals. These infections can manifest as mucormycosis, a potentially serious and life-threatening condition
Experiment 5
Aim: Collection and processing of samples for diagnosis of fungal infections in skin, hair, nail scrapings.
Collection, processing of sample for fungal infection in Skin
It's essential to transport samples promptly to the laboratory and communicate relevant clinical information to ensure accurate and timely diagnosis. The following steps are followed to collect skin sample:
1. Preparation: Wash hands thoroughly and wear sterile gloves to prevent contamination. Clean the affected area of the skin with an antiseptic solution to minimize surface contamination.
2. Collection Method:
Scrapings: Gently scrape the affected skin to collect scales, crusts, or debris by using a sterile scalpel.
Skin Swab: Alternatively, a sterile cotton swab can be rolled over the affected area to collect superficial material. Swabs are particularly useful for moist lesions.
Processing of Sample for Fungal Infection in Skin
1. Direct Microscopic Examination: Place a portion of the collected material on a glass slide and add a drop of 10-20% potassium hydroxide (KOH). Gently heat the slide to dissolve keratin and other debris. Cover the specimen with a cover slip and examine under a microscope.
2. Fungal Cultures: Inoculate a portion of the collected material onto as Sabouraud dextrose agar. Incubate the cultures at the appropriate temperature (usually 25-30°C for most dermatophytes) and monitor for fungal growth.
Collection, processing of sample for fungal infection in the Nail.
The collection and processing of samples for fungal infection in the nail is known as onychomycosis. The following steps are followed to collect and process nail samples for fungal infection.
1. Patient Preparation: Ensure the patient's hands or feet are clean, and the nails are dry.
2. Collection Tools: Use a pair of sterile nail clippers or a sterile scalpel for sample collection. Sterilize the tools before use to prevent contamination.
3. Nail Sampling: Choose a nail that shows clinical signs of infection, such as discoloration, thickening, or deformation. Trim the nail as close to the affected area as possible. Ensure that both the free edge and the material from beneath the nail are collected.
4. Sample Size: Collect an amount of nail material sufficient for both microscopic examination and culture. The collected material should include nail fragments and debris.
5. Handling and Packaging: Place the collected nail material into a sterile, leak-proof container. Label the container with patient information, including name, date of birth, and the site of sample collection.
6. Microscopic Examination: A part of the collected sample can be directly examined under a microscope after mounting it in potassium hydroxide (KOH) solution. This helps in visualizing fungal elements such as hyphae, spores, or pseudohyphae.
7. Culture: The remaining portion of the sample is cultured on Sabouraud dextrose agar to isolate and identify the causative fungi. Incubate the culture at an appropriate temperature (usually 25-30°C) and monitor it for fungal growth over several weeks.
8. Identification: Once fungal colonies appear on the culture, they can be identified through macroscopic and microscopic characteristics, biochemical tests, or molecular methods.
Collection, processing of sample for fungal infection in the Hair
Collecting and processing samples for the diagnosis of fungal infections in the hair requires obtaining specimens from affected areas to identify the causative agent. The following are general guide lines on the collection and processing of samples for hair-related fungal infections.
Collection of sample for fungal infection in the Hair:
1. Skin and Hair Scrapings: Collect scales, debris, or hair fragments from affected area using a blunt scalpel.
2. Cotton Swab Technique: Rub a sterile cotton swab over the affected area to collect debris and scales.
Processing of Samples
1. Direct Microscopy: Place the collected material on a glass slide and add a drop of potassium hydroxide (KOH) solution. Cover with a coverslip and gently heat. Fungal hyphae and spores can be observed.
2. Fungal Cultures: Inoculate a portion of the collected material onto Sabouraud agar. Incubate the culture at appropriate temperatures for the suspected fungal pathogen (e.g. room temperature or 37°C for dermatophytes). Cultures allow for the growth and identification of the causative fungus..
Experiment No 6
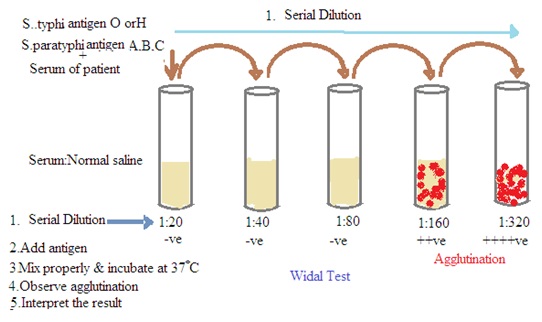
Aim: To perform Widal test by slide and tube method.
Principle: The Widal test is a serological test. It is used for the diagnosis of enteric fever, including typhoid and paratyphoid fever. The Widal test is based on the principle of agglutination. The patient's serum is mixed with standardized suspensions of the specific Salmonella antigens (Antigen O and Antigen H of S. typhi and S. paratyphi). Visible agglutination (clumping of bacteria) occurs if antibodies against these antigens are present in the patient's serum. This indicates a positive reaction.
Procedure:
1. Sample Collection: Blood is collected from the patient.
2. Serum Separation: The collected blood is allowed to clot. The serum is separated by centrifugation.
3. Preparation of Antigen Suspensions: Standardized suspensions of S. typhi and S. paratyphi antigens are prepared.
4. Serial Dilutions: The patient's serum is serially diluted to create a range of dilutions.
5. Mixing of Serum and Antigen: Each dilution of the patient's serum is mixed with the standardized bacterial antigens.
6. Incubation: The mixture is incubated at a specific temperature for a set period.
7. Observation: After incubation, the tubes or slides are examined for agglutination. Agglutination indicates the presence of antibodies.

Experiment No 7
Aim: To perform ASO titre test.
The Anti-Streptolysin O (ASO) test is a serological test. It is used to detect the presence of antibodies against streptolysin O. The streptolysin-O is a toxin produced by Group A Streptococcus bacteria. This test is commonly used to diagnose streptococcal infections, Which cause strep throat and rheumatic fever.
Principle: The principle of the ASO test is based on the immune response of the body to the streptococcal infection. Streptolysin-O is a hemolysin produced by Group A Streptococcus. The human body produces antibodies (anti-streptolysin O antibodies or ASO antibodies) in response to the infection. The ASO test measures the level of these antibodies in the patient's serum.
Procedure
1. Sample Collection: Blood is collected from the patient during the acute phase of the infection.
2. Serum Separation: The collected blood is allowed to clot, and serum is separated by centrifugation.
3. ASO Test Procedure: The patient's serum is mixed with standardized Streptolysin O antigen. The mixture is incubated. The formation of antigen-antibody complexes occurs during incubation.
4. Detection: After incubation, the reaction is observed for the presence of visible precipitates or turbidity. It indicates the formation of immune complexes.
5. Titration: Similar to the Widal test, the ASO test is often performed in a series of dilutions (titration) to determine the endpoint titer.
Experiment No 8
Aim: To perform CRP test.
The CRP test is widely used in clinical practice as a valuable tool for assessing inflammation, monitoring disease progress, and guiding treatment decisions.
Principle: C-reactive protein (CRP) is an acute-phase reactant produced by the liver in response to inflammation. The CRP test measures the concentration of CRP in the blood, showing the presence and intensity of inflammation in the body. The principle involves the use of an antibody that specifically binds to CRP. This allows the quantification of CRP levels in the patient's serum.
Techniques:
1. Sample Collection: Blood is collected from the patient, usually through venipuncture.
2. Serum Separation: The collected blood is allowed to clot, and serum is separated by centrifugation.
3. CRP Test Procedure: The patient's serum is mixed with a CRP-specific antibody or a substance that binds to CRP.
4. Detection: The interaction between CRP in the serum and the specific antibody or binding substance forms a measurable complex. The level of this complex is then quantified using various techniques, such as immunoturbidimetry or enzyme-linked immunosorbent assay (ELISA).
Interpretation
1. Normal Range: Normal CRP levels in healthy individuals are usually low, typically less than 10 mg/L.
2. Elevated CRP Levels: Elevated CRP levels indicate the presence of inflammation in the body.
3. Clinical Significance: Its elevated levels occur in various conditions, including infections, tissue injury, autoimmune diseases, and cardiovascular diseases.
4. Monitoring Response to Treatment: CRP levels can be monitored over time to assess the effectiveness of treatment in managing inflammatory conditions.
5. Limitations: CRP is a sensitive marker of inflammation, but it lacks specificity for identifying the cause of inflammation. Elevated CRP can be seen in both infectious and non-infectious inflammatory conditions.
Experiment No 9
Aim: To perform a Rheumatoid factor test.
Principle, techniques, and interpretation of Rheumatoid factor (RF)
Rheumatoid arthritis is a chronic systemic inflammatory autoimmune disease. Rheumatoid arthritis patient serum has Rheumatoid factor (RF). Rheumatoid factor (RF) is an antibody. Rheumatoid factor (RF) may also be present in the serum of patient suffering from other diseases.
Principle: Rheumatoid factor (RF) is an antibody that targets the immunoglobulin G (IgG) antibodies. Latex particles coated with IgG react with the patient’s serum containing RF. The RF acts as an antibody to IgG on the latex particles. This causes agglutination. The RF test is used as a diagnostic tool for rheumatoid arthritis (RA) and some other autoimmune disorders. The principle of the test involves detecting the presence and quantity of RF in a patient's serum.
Procedure
1. Sample Collection: Blood is collected from the patient through venipuncture.
2. Serum Separation: The collected blood is allowed to clot, and serum is separated by centrifugation.
3. RF Test Procedure:
Reagents: Latex reagents (Polystyrene particles coated with human IgG), Glycerine saline buffer pH 8.2.
Prepare 1:20 dilution of the patient’s serum by mixing 950 microliters of glycerine saline buffer and 50 microliters of serum. Place one drop of diluted serum on a properly labeled clean slide. Mix latex reagents thoroughly. and add one drop of serum. Mix using a wooden applicator stick. Observe agglutination (Immune complex) for 2 minutes.
The patient's serum is mixed with particles coated with IgG. If RF antibodies are present in the serum, they will bind to the Fc portion of IgG-coated particles. This forms immune complexes.
4. Detection: The presence of immune complexes is detected using various methods, such as nephelometry or latex agglutination. Nephelometry measures the amount of light scattered by the immune complexes, providing a quantitative result.
Interpretation
1. Interpretation of Results: A positive result indicates the presence of RF in the patient's serum..
2. Quantitative Results: The RF test results are reported as titers (e.g., 1:40, 1:80, etc.) or as quantitative values in international units per milliliter (IU/mL).
3. Clinical Correlation: RF is not specific to rheumatoid arthritis and can be found in healthy individuals and other autoimmune conditions. Clinical correlation, along with other laboratory and imaging tests, is essential for an accurate diagnosis.
4. Serial Testing: Serial testing over time may be used to monitor the progress of the disease and the response to treatment..
5. False Positives and False Negatives: False positives can occur in conditions other than rheumatoid arthritis, such as systemic lupus erythematosus (SLE) or chronic infections. Some individuals with rheumatoid arthritis may have negative RF test results.
Experiment No 10
Aim: To perform VDRL Test.
The VDRL (Venereal Disease Research Laboratory) test is a blood test used to screen for syphilis, a sexually transmitted infection caused by the bacterium Treponema pallidum. They detect antibodies that are produced in response to syphilis but are not specific to the bacterium itself.
Principle: The VDRL is based on the principle of detecting antibodies, mainly IgM and IgG. IgM and IgG are produced in response to infection with Treponema pallidum. The test uses cardiolipin, a substance derived from beef heart, as an antigen. The reaction involves the interaction of patient serum with cardiolipin, and if antibodies against syphilis are present, a visible reaction occurs.
Procedure
1. Sample Collection: Blood is collected from the patient via venipuncture.
2. Serum Separation: The collected blood is allowed to clot, and serum is separated by centrifugation.
3. VDRL/RPR Test Procedure: The patient's serum is mixed with a cardiolipin antigen suspension. The mixture is observed for the development of visible clumping or flocculation, indicating a positive reaction.
4. Quantitative vs. Qualitative Testing: The tests can be performed qualitatively (positive/negative) or quantitatively, depending on the laboratory's procedures.
Interpretation:
1. Interpretation of Results: A non-reactive or negative result suggests the absence of syphilis antibodies. A reactive or positive result indicates the presence of antibodies, but it does not differentiate between active and past infections.
2. Quantitative Results: Quantitative results are expressed as titers (e.g., 1:8, 1:16, etc.). Higher titers may suggest a more active or recent infection.
3. Confirmatory Testing: Positive VDRL/RPR results should be confirmed with more specific treponemal tests, such as the fluorescent treponemal antibody absorption (FTA-ABS) test or the Treponema pallidum particle agglutination assay (TP-PA).
4. False Positives: Non-treponemal tests can yield false positives in conditions other than syphilis, such as autoimmune diseases, pregnancy, and some viral infections.
Dr Pramila Singh
