Automatic Tissue Processor
Histokinete (Automatic Tissue Processor) - its Types, Working, Care, and Maintenance.
HISTOPATHOLOGY
Dr Pramila Singh
10/28/20237 min read


Histokinete (Automatic Tissue Processor) - Its Types, Working, Care, and Maintenance
Dt Pramila Singh
Types of Automatic Tissue Processors
Automatic tissue processors are used to process tissue specimens and prepare them for microscopic examination. Tissue processors used in histopathology are of the following types
1. Linear/Circular Automatic processor: It is the most commonly used tissue processor. It consists of a series of reagent containers arranged in a linear or circular manner. Tissue cassettes hold the specimen that moves through each station. Tissue is immersed into a reagent at each station.
2. Basket/Rotary Automatic Tissue Processor: Tissue cassettes are placed in a basket or a rotating chamber. The basket or chamber moves through reagent containers. Its design allows better agitation of the reagent and tissues. This facilitates efficient processing.
3. Vacuum Infiltration Automatic Tissue Processor: It has a vacuum system. The creation of a vacuum increases the infiltration of reagents into tissue specimens. Vacuum improves penetration of reagents, reduces tissue processing time, and maintains tissue quality. This agitation reduces processing time and ensures consistent results.
4. Microwave-Assisted Automatic Tissue Processors: Microwave technology in automatic tissue processors accelerates tissue processing steps. Microwave energy speeds up various steps such as tissue fixation, dehydration, and clearing steps. It reduces overall processing time and maintains tissue quality.
5. Continuous flow Automatic Tissue Processor: It uses a conveyor belt system to move tissue cassettes through different reagent solutions. It allows a continuous flow of tissue specimens that ensure fast and efficient processing.
6. Robotic Automatic Tissue Processors: It is an advanced system that utilizes robotic arms to handle and process tissue specimens. It offers high precision and reproducibility without the intervention of humans.
7. Modular Automatic Tissue Processor: It is flexible, and allows customizing as per needs. It can choose and combine different steps such as fixation, dehydration, clearing, and embedding.
Working of Automatic Tissue Processors:
An automatic tissue processor is used to prepare tissue samples for microscopic examination. The following steps are followed in automatic tissue processors.
1. Tissue fixation: Placement of tissue section in cassettes containing fixative solution. Formalin is used as a fixative solution that also preserves the tissues. Place the cassettes in a basket or rack.
2. Dehydration: Move the basket containing tissue cassettes through a series of alcohol solutions. Alcohol concentration increases gradually in the dehydration process. It dehydrates the tissue.
3. Clearing: Move dehydrated solution through a clearing agent such as xylene. These solutions replace the alcohol present in the tissue. It makes tissue more transparent and ready for embedding with paraffin.
4. Infiltration: Immerse dehydrated and cleared sample in paraffin wax or similar embedding medium. Allow solidification of paraffin wax.
5. Sectioning: Microtome is used to cut thin sections of embedded tissue.
6. Staining: Place a tissue section on the slide and stain it. Hematoxylin and eosin (H&E) solution is used to stain cellular components of the tissue specimen.
7. Cover slipping: Place cover slip on the tissue section after its staining and drying.
8. Microscopic examination: Prepare slide is ready to be examined under a microscope.
An automatic tissue processor automates these steps. It ensures the high quality of tissue processors.
Care and maintenance of tissue processors: The following guidelines are followed to maintain and care automatic tissue processors.
1. Follow the manufacturer’s guidelines.
2. Regular cleaning
3. Check the regent level.
4. Empty waste container,
5. Inspect the vacuum line
6. Perform routine maintenance
7. Calibration and verification,
8. Use higher quality Reagents
9. Trained skilled operators
10. Monitor safety features,
11. Store properly
12. Address tissues properly,
13. Keep records.
Dr Pramila Singh
Microtome Knives (Microtome blades)
A microtome knife is a tool to cut tissue specimens in histology and pathology laboratories for microscopic examination. The process of cutting tissue specimens into thin tissue sections is called sectioning. Microtome knife is made of high-quality steel or tungsten carbide. Microtome knives are available in various shapes, sizes, and cutting-edge angles.
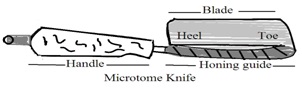
Parts of microtome knife: Microtome knife consists of the following parts
1. Blade: The blade is the cutting edge of a microtome knife. It is made of high-quality steel with a very sharp edge. The back portion of the blade closer to the knife holder is called the heel. The leading portion of the blade at the knife tip is called the toe.
2. Knife holder: It holds blade in the place. It allows accurate adjustment of the knife for thin-section cutting of tissue specimens.
3. Knife angle adjuster: Some microtome knives have an angle adjuster. It allows to setting angle of the knife for section cutting.
4. Knife handle: It is used to grip the microtome knife. It provides stability during tissue section cutting.
Various types of microtome knives
1. Disposable Microtome blades: These are pre-sharpened blades designed to cut thin sections of tissues. They are ideal for routine section cutting of tissues. They are commonly used in histopathology laboratories for efficient and quick cutting of tissue sections.
2. Disposable knife holders: These holders are designed to hold disposable knives/blades. They ensure accurate section cutting of tissues without frequent blade adjustment.
3. Reusable microtome knives: These knives are made of high-quality materials like stainless steel or tungsten carbide. They are durable and suitable for multiple uses. They can be re-sharpened after use to maintain their cutting efficiency. They are more economical in the long run.
4. Low profile microtome blades: They are thinner with less height. They are designed to cut soft and delicate tissues. They do not damage the tissue during tissue section cutting.
5. High-profile Microtome blades: They are taller and thicker in design. They are suitable for cutting hard and dense tissues. They provide stability and better control during section cutting of tissues.
6. Blade holders for reusable knives: Blade holders are used to mount and secure the knife. These holders have fine adjustment mechanisms to control the angle and position of the knife. They ensure precise section cutting.
7. Diamond knives: They are used for ultra-thin section cutting of tissues. They have cutting-edge diamond particles. They offer exceptional sharpness and precision to produce ultra-thin sections of tissues. The thickness of the tissue will be in nanometers.
8. Glass knives: They are used for special applications such as frozen tissue section cutting. They are made of glass
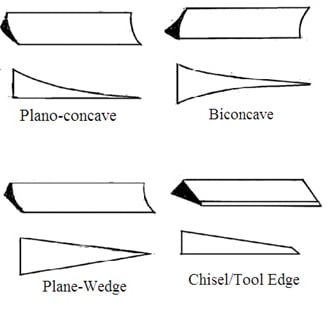
Types of knife (blade) on the basis of its shape
1. Plano concave knives: It has one plane surface and another concave surface. It is used to cut soft or foam compounds. The knife should be placed obliquely at the object during section cutting.
2. Biconcave knife: It is similar to a plano concave knife. But it has a thicker back, and concavity on both sides. It is used to cut hard materials.
3. Wedge knife: It is more rigid than plano concave and biconcave knives. Both cutting surfaces are plane. It has extra thickness at the tip. It is used for section cutting of the cryostat specimen.
4. Tool edge knife: It has excellent stability and helps to cut hard materials. The blade has lower sharpness than other knives and planes from both sides.
Dr. Pramila Singh


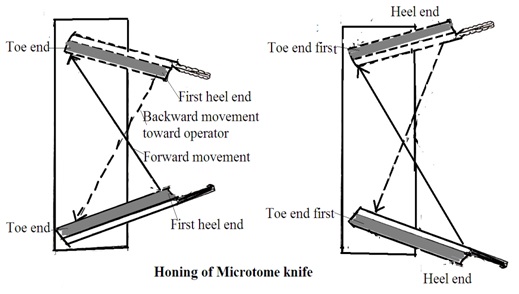
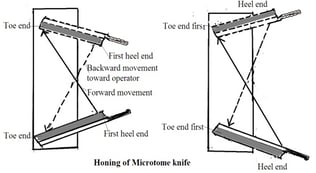
Sharpening of knives - Honing technique
Sharpening or Honing of microtome knife is a critical technique to ensure the sharpness and efficacy of the knife. There are two techniques to hone microtome knives.
1. Sharpening with a Whetstone or Hone: A whetstone is also called a sharpening stone or hone. It is a traditional tool to sharpen A knife. It is made of natural or artificial materials. Natural sharpening stone is called oil stone examples are Arkansas stone, yellow Belgian glass stone, and green Belgian glass stone. An artificial stone example is plate glass carborundum. The following steps are followed to sharpen a knife.
· Preparation: Remove the microtome knife from the microtome holder. Clean the knife to remove debris or residue.
· Angle setting: Position the blade at a suitable angle on the whetstone. The angle depends upon the type of knife and the knife manufacturer’s recommendation.
· Sharpening stroke: Apply gentle pressure on the knife. Move the knife across the whetstone’s surface in a controlled motion from the toe end to the heel end. Repeat the process on both sides of the blade to get the required sharpness.
· Honing: It is the last step. Use finer grit stones to polish and refine the edge. This step makes the knife smoother and more durable.
2. Sharpening with the honing machine: It is used in large medical laboratories. It is designed to sharpen the microtome knife quickly and precisely. Insert a knife into the automated honing machine. The machine grinds and hones the blade to the desired sharpness.
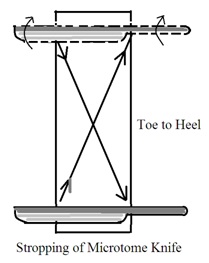
Stropping technique
Stropping is a process of refining and polishing the cutting edge of a microtome knife after its sharpening or honing. It is a must to ensure the knife is in optimal condition for accurate and smooth section cutting of tissues. Stropping helps to remove imperfections from the knife edge. It enhances the sharpness and cutting performance of the knife. The following steps are followed for stropping on a microtome knife
1. Preparation: Clean the sharpened microtome knife.
2. Stropping medium: A strop is a flat and flexible strip made of leather or similar material. Use stropping compound on stropping medium. Stropping compound or paste contains fine abrasive particles. Stropping compounds are available in different grits. The selection of stropping medium depends upon the knife and desired refinement.
3. Application of stropping compound: Apply a very small amount of stropping compound to the strop’s surface (stropping medium surface). Spread the stropping compound evenly on strop medium surface using a finger or a cloth.
4. Stropping Motion: Hold the microtome knife at the appropriate angle. Approximately 20 to 30 degrees. Draw the knife across the strop’s surface (stropping medium surface). The stropping motion should be smooth and gentle. Always move the knife away from the cutting edge. Repeat this process several times on each side of the blade.
5. Even pressure: Apply even pressure throughout the stropping process. This ensures uniform polishing of the entire cutting edge of the knife.
6. Clean the knife: Wipe the microtome knife with a clean, soft cloth to remove the stropping compound.